* Run the Homeassistant Discovery directly after connecting to the broker. Before it was delayed 10s and happened while the first round alredy was in progress

* schedule sending HA discovery and static topics

* Allow setting QOS for MQTT topics

* .

* .

* change MQTT QOS1 expiration time from (default) 30 to 5s

* add logging of heap change on MQTT topic sendings

* wait for MQTT transmission timeout after publishing

* use QOS0 for Homeassistant Discovery topics. the messages then could possibly get lost but we save a lot of heap

* .

* use PSRAM for the MQTT outbox

* use QOS1 for HA discovery again

* .

* .

* disable delay, not needed with PSRAM

* .

* consolidated scheduledSendingOf_DiscoveryAndStaticTopics into sendingOf_DiscoveryAndStaticTopics_scheduled

* Send Homeasstsiatnt Discovery and static data in MQTT step instead of when the wifi gets connected

* "WIFI roaming" by channel scan (AP switching at low RSSI) (#2120)

* Activate 802.11kv wifi mesh roaming

* Activate roaming by scanning

* Revert stack reducation

* move Wifi, LWIP and BSSI to PSRAm

* added State Class "measurement" to rate_per_time_unit (#2116)

Co-authored-by: CaCO3 <caco@ruinelli.ch>

* use QOS0 for Homeassistant Discovery topics. the messages then could possibly get lost but we save a lot of heap

* use QOS0 for Homeassistant Discovery topics. the messages then could possibly get lost but we save a lot of heap

# Conflicts:
#	code/components/jomjol_mqtt/server_mqtt.cpp

# Conflicts:
#	code/components/jomjol_mqtt/server_mqtt.cpp

* .

* .

* move to next PR

* Update code/components/jomjol_mqtt/server_mqtt.cpp

* Update code/components/jomjol_mqtt/server_mqtt.cpp

---------

Co-authored-by: CaCO3 <caco@ruinelli.ch>
Co-authored-by: Slider0007 <115730895+Slider0007@users.noreply.github.com>
Build
Preparations
git clone https://github.com/jomjol/AI-on-the-edge-device.git
cd AI-on-the-edge-device
git checkout rolling
git submodule update --init
Build and Flash within terminal
See further down to build it within an IDE.
Compile
cd code
platformio run --environment esp32cam
Upload
pio run --target upload --upload-port /dev/ttyUSB0
Alternatively you also can set the UART device in platformio.ini, eg. upload_port = /dev/ttyUSB0
Monitor UART Log
pio device monitor -p /dev/ttyUSB0
Build and Flash with Visual Code IDE
-
Download and install VS Code
-
Install the VS Code platform io plugin
-
- Check for error messages, maybe you need to manually add some python libraries
- e.g. in my Ubuntu a python3-env was missing:
sudo apt-get install python3-venv
- e.g. in my Ubuntu a python3-env was missing:
-
-
git clone this project
-
in Linux:
git clone https://github.com/jomjol/AI-on-the-edge-device.git
cd AI-on-the-edge-device
git checkout rolling
git submodule update --init
-
-
in VS code, open the
AI-on-the-edge-device/code- from terminal:
cd AI-on-the-edge-device/code && code .
- from terminal:
-
open a pio terminal (click on the terminal sign in the bottom menu bar)
-
make sure you are in the
codedirectory -
To build, type
platformio run --environment esp32cam- or use the graphical interface:
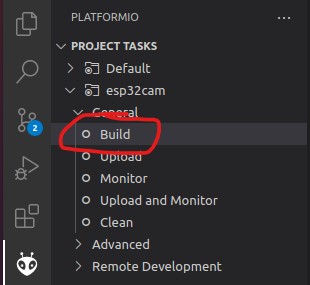
- the build artifacts are stored in
code/.pio/build/esp32cam/
- or use the graphical interface:
-
Connect the device and type
pio device monitor. There you will see your device and can copy the name to the next instruction -
Add
upload_port = you_device_portto theplatformio.inifile -
make sure an sd card with the contents of the
sd_cardfolder is inserted and you have changed the wifi details -
pio run --target eraseto erase the flash -
pio run --target uploadthis will upload thebootloader.bin, partitions.bin,firmware.binfrom thecode/.pio/build/esp32cam/folder. -
pio device monitorto observe the logs via uart